Object Detection with YOLOXTrainer
This notebook shows how to train an YOLOX object detection model on the BCCD (Blood Cell Count and Detection) dataset using Datamint’s Trainer API.
About YOLOX
YOLOX is an anchor-free, single-stage object detector that simplifies the YOLO pipeline by removing the need to pre-define anchor boxes. It comes in six size variants — nano, tiny, s, m, l, x — so you can trade speed for accuracy with a single parameter.
Ge, Z., Liu, S., Wang, F., Li, Z., & Sun, J. (2021). YOLOX: Exceeding YOLO Series in 2021. arXiv preprint arXiv:2107.08430.
What You’ll Learn
Upload images and bounding box annotations to Datamint
Train a YOLOX detection model with one line of code
Visualize predictions locally
Deploy the trained model to the Datamint server and run remote inference
Required Dependencies
pip install datamint[detection] "torchmetrics[detection]>=1.0"
[1]:
from datamint import Api

PROJECT_NAME = "bccd_detection"
api = Api()
/home/luan/Desktop/Datamint/Codes/datamint-python-api/datamint/env/lib/python3.12/site-packages/tqdm/auto.py:21: TqdmWarning: IProgress not found. Please update jupyter and ipywidgets. See https://ipywidgets.readthedocs.io/en/stable/user_install.html
  from .autonotebook import tqdm as notebook_tqdm
1. Setup: Create Project and Load Dataset
datamint.examples.bccd_dataset downloads the BCCD dataset, parses its Pascal VOC bounding-box annotations, and uploads everything to a Datamint project: 364 microscopy images across three classes (RBC, WBC, Platelets). The dataset is cached locally after the first download, and the call is idempotent, if the project already exists, it’s returned as-is without re-uploading.
[ ]:
from datamint.examples import bccd_dataset

proj = bccd_dataset.create(project_name=PROJECT_NAME)
proj
2. Training with YOLOXTrainer
This is where the Trainer API shines. Instead of manually defining:
A detection dataset with the correct annotation parsing
A variable-length collate function for bounding boxes
A LightningModule wiring YOLOX’s internal loss and NMS
Callbacks, loggers, and a Lightning Trainer
A deployment adapter
…you simply create a YOLOXTrainer and call fit().
The trainer automatically:
Builds a
DetectionDatasetfrom the Datamint projectConstructs a stable class map from annotation identifiers, sorted alphabetically
Creates bbox-aware augmentation pipelines (resize, flip, color jitter, normalize)
Instantiates a
YOLOXModulewrapping the chosen YOLOX variantConfigures MLflow logging, checkpointing on
val/map, and early stoppingTrains, evaluates on the test split, and registers the best checkpoint in the MLflow Model Registry
Index |
Class |
|---|---|
0 |
Platelets |
1 |
RBC |
2 |
WBC |
[3]:
import random

all_resources = list(api.resources.get_list(project_name=PROJECT_NAME))
all_resources.sort(key=lambda r: r.filename)

random.seed(42)
random.shuffle(all_resources)

n_total = len(all_resources)
n_train = int(0.7 * n_total)
n_val = int(0.15 * n_total)

train_resources = all_resources[:n_train]
val_resources = all_resources[n_train:n_train + n_val]
test_resources = all_resources[n_train + n_val:]

api.projects.assign_splits(train_resources, split_name='train', project=proj)
api.projects.assign_splits(val_resources, split_name='val', project=proj)
api.projects.assign_splits(test_resources, split_name='test', project=proj)

print(f"Train: {len(train_resources)}, Val: {len(val_resources)}, Test: {len(test_resources)}")
Train: 254, Val: 54, Test: 56
[ ]:
from datamint.lightning import YOLOXTrainer

trainer = YOLOXTrainer(
    project=PROJECT_NAME,
    model_size="s",    # nano / tiny / s / m / l / x
    image_size=416,
    batch_size=8,
    max_epochs=10,
    early_stopping_patience=10,
    accelerator="auto",
)

results = trainer.fit()
[5]:
# Class map built from annotations — needed to convert prediction indices back to names
class_map     = trainer.dataset.box_class_map            # {'Platelets': 0, 'RBC': 1, 'WBC': 2}
inv_class_map = {v: k for k, v in class_map.items()}  # {0: 'Platelets', 1: 'RBC', 2: 'WBC'}

print("Class map:   ", class_map)
print("Test metrics:", results["test_results"])
Class map:    {'Platelets': 0, 'RBC': 1, 'WBC': 2}
Test metrics: [{'test/map': 0.4984062910079956}]
Inspect the Registered Model
Training automatically registered the model in Datamint’s model registry (backed by MLflow). Use api.models to inspect it without touching MLflow’s client directly:
[ ]:
registered_model = api.models.get_by_name(PROJECT_NAME)
latest_version = registered_model.get_latest_version()

print(f"Version: {latest_version.version}")
print(f"Task type: {latest_version.get_task_type()}")
print(f"Supported modes: {latest_version.get_supported_modes()}")
print("Metrics:")
for metric_name, value in latest_version.get_metrics().items():
    print(f"  {metric_name}: {value}")
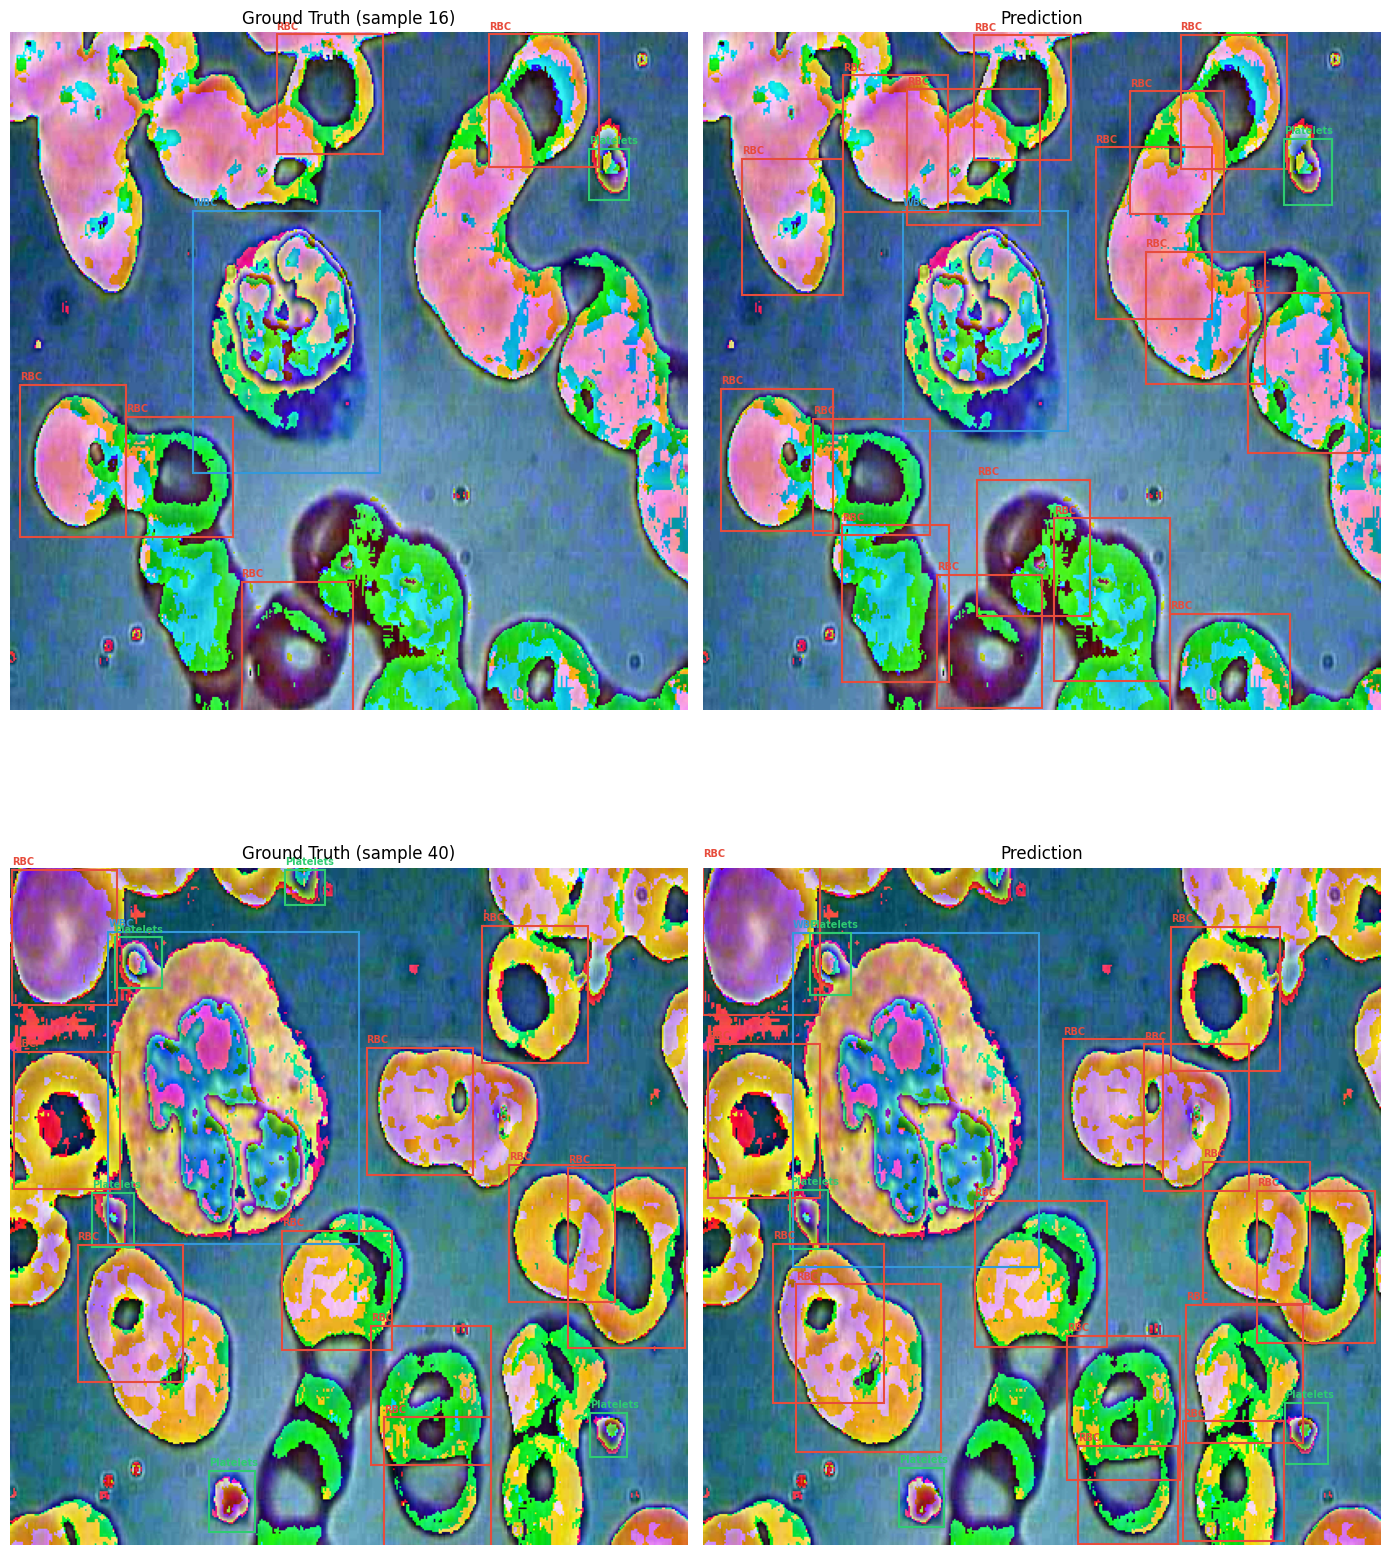
3. Visualize Predictions
Let’s visualize the model predictions against ground truth on test samples.
[6]:
import matplotlib.patches as mpatches
import matplotlib.pyplot as plt
import numpy as np
import torch
from yolox.utils import postprocess

COLORS = {"RBC": "#e74c3c", "WBC": "#3498db", "Platelets": "#2ecc71"}

model = trainer.model
model.eval()

test_dataset = trainer.datamodule.test_dataloader().dataset

fig, axes = plt.subplots(2, 2, figsize=(14, 18))

for row in range(2):
    idx = np.random.randint(len(test_dataset))
    sample = test_dataset[idx]
    image  = sample["image"]   # (C, H, W) tensor
    gt_boxes  = sample["boxes"]   # (N, 4) pascal_voc
    gt_labels = sample["box_labels"]  # (N,)

    with torch.inference_mode():
        raw  = model.model(image.unsqueeze(0).to(model.device))
        preds = postprocess(raw, model.hparams["num_classes"],
                            model.hparams["conf_thre"], model.hparams["nms_thre"])

    img_np = (image.permute(1, 2, 0).cpu().numpy() * 255).astype(np.uint8)

    # Ground truth
    ax = axes[row, 0]
    ax.imshow(img_np)
    for box, lbl in zip(gt_boxes, gt_labels):
        cls_name = inv_class_map.get(int(lbl), str(int(lbl)))
        color = COLORS.get(cls_name, "white")
        x1, y1, x2, y2 = box.tolist()
        ax.add_patch(mpatches.Rectangle((x1, y1), x2 - x1, y2 - y1,
                                         linewidth=1.5, edgecolor=color, facecolor="none"))
        ax.text(x1, y1 - 3, cls_name, color=color, fontsize=7, fontweight="bold")
    ax.set_title(f"Ground Truth (sample {idx})")
    ax.axis("off")

    # Prediction
    ax = axes[row, 1]
    ax.imshow(img_np)
    if preds[0] is not None:
        for det in preds[0].cpu():
            x1, y1, x2, y2 = det[:4].tolist()
            cls_name = inv_class_map.get(int(det[6]), str(int(det[6])))
            color = COLORS.get(cls_name, "white")
            ax.add_patch(mpatches.Rectangle((x1, y1), x2 - x1, y2 - y1,
                                             linewidth=1.5, edgecolor=color, facecolor="none"))
            ax.text(x1, y1 - 3, cls_name, color=color, fontsize=7, fontweight="bold")
    ax.set_title("Prediction")
    ax.axis("off")

plt.tight_layout()
plt.show()
/home/luan/Desktop/Datamint/Codes/datamint-python-api/datamint/env/lib/python3.12/site-packages/albumentations/core/transforms_interface.py:310: UserWarning: The image is already an RGB.
  target_function(ensure_contiguous_output(arg), **params),
4. Deployment
The trainer automatically registered a deployment-ready model in MLflow after training. You can deploy it directly to the Datamint server:
[15]:
job = api.deploy.start(
    model_name=PROJECT_NAME,
    model_alias="latest",
    with_gpu=False,
)

print("Deployment job started!")
print(f"Job ID: {job.id}")
print(f"Status: {job.status}")
Deployment job started!
Job ID: 3c452320-cc89-4f4c-98d5-cd3c4b7ee6b8
Status: running
[16]:
job = api.deploy.get_by_id(job.id)

print(f"Job Status: {job.status}")
print(f"Progress:   {job.progress_percentage}%")

if job.error_message:
    print(f"Error: {job.error_message}")
Job Status: running
Progress:   50%
Model.is_deployed() reports the same thing, without tracking job IDs, once the job above reaches completed.
[ ]:
registered_model.is_deployed()
4.1 Remote Inference
[ ]:
r = api.resources.get_list(project_name=PROJECT_NAME, limit=1)[0]

inf_job = api.inference.submit(
    model_name=PROJECT_NAME,
    model_alias="latest",
    resource_id=r.id,
)
inf_job.wait()
[ ]:
preds = inf_job.predictions[0]  # list[BoxAnnotation] for the first resource

img_np = np.array(r.fetch_file_data(auto_convert=True, use_cache=True))

fig, ax = plt.subplots(figsize=(8, 6))
ax.imshow(img_np)
for box in preds:
    cls_name = inv_class_map.get(int(box.identifier), box.identifier)
    x1, y1, _ = box.geometry.point1
    x2, y2, _ = box.geometry.point2
    color = COLORS.get(cls_name, "white")
    ax.add_patch(mpatches.Rectangle(
        (x1, y1), x2 - x1, y2 - y1,
        linewidth=2, edgecolor=color, facecolor="none",
    ))
    ax.text(x1, y1 - 4, cls_name, color=color, fontsize=8, fontweight="bold")
ax.axis("off")
ax.set_title(getattr(r, "name", str(r.id)))
plt.tight_layout()
plt.show()
[ ]:
proj.show()
Summary: What the Trainer API Automates
The Trainer API automatically handles the full detection workflow, including:
Dataset loading and box annotation parsing
Variable-length collate function for bounding boxes
Bbox-aware augmentation pipelines (resize, flip, color jitter, normalize)
Stable class map construction from annotation identifiers
YOLOX model instantiation (anchor-free, internal loss)
Mean Average Precision metric configuration
Lightning Trainer setup with early stopping on
val/mapMLflow experiment tracking and checkpoint registration
Test-time evaluation
Deployment-ready model artifact