Upload Images & Segmentations (No Coding Required)
Beginner
This guide is for people who need to upload medical images and segmentations to Datamint, but don’t write code. It walks through everything from a brand new computer to your first successful upload, one step at a time.
Note
Already comfortable with Python, pip, and a terminal? You’ll move faster with
the regular Quick Start guide instead.
What you’ll do
Set up a terminal on your computer (Mac or Windows).
Install Datamint (one command).
Get your API key and connect it.
Upload your images.
Upload segmentations alongside them.
A “terminal” is just a window where you type a line of text and press Enter, instead of clicking buttons. It looks intimidating the first time, but every command below can be copy-pasted exactly as written.
Step 1: Set up your computer
Install Python: go to python.org/downloads, click the big Download Python button, open the downloaded file, and click through the installer with the default options.
Open the Terminal app: press
Cmd + Space, typeTerminal, and press Enter.
From here on, every command in this guide goes into that Terminal window.
Use WSL (Windows Subsystem for Linux). WSL gives you a small, reliable Linux environment inside Windows, and it’s what the rest of this guide assumes.
Open the Start Menu, search for PowerShell, right-click it, and choose Run as administrator.
In the blue window that opens, type:
wsl --installRestart your computer when it asks you to.
After restarting, open the Start Menu again and search for Ubuntu. Open it. The first time, it will ask you to create a username and password for this Linux environment. Pick anything you’ll remember, it does not need to match your Windows login.
From here on, whenever this guide says “open a terminal,” open Ubuntu from the Start Menu. It behaves just like the Mac Terminal.
‘wsl’ is not recognized / WSL won’t install
Your Windows version may be too old, or WSL may be disabled by your organization’s IT policy. See Microsoft’s WSL install documentation, or ask your IT administrator to enable it for you.
Step 2: Install Datamint
In your terminal (Mac Terminal, or Ubuntu on Windows), paste this and press Enter:
pip install -U datamint
Check it installed correctly:
python3 -c "import datamint; print(datamint.__version__)"
If that prints a version number (like 2.18.4), you’re set.
‘python3’ or ‘pip’ is not recognized / command not found
On Mac, make sure you finished the Python installer in Step 1, then close and reopen the Terminal app.
Some systems use
python/pipinstead ofpython3/pip3, try that instead.If
pipalone doesn’t work, try this commandpython3 -m pip install -U datamint.
Step 3: Get and set your API key
Setup API Key
Obtaining an API key
Before using the Datamint API, you need to configure your API key. If you have the necessary permissions, you can obtain one from the Datamint platform:
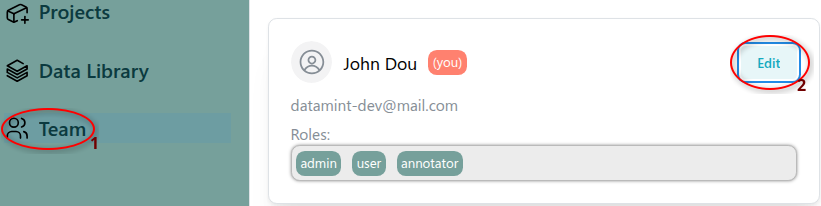
In the left sidebar, select Teams.
Click Edit on your user profile.
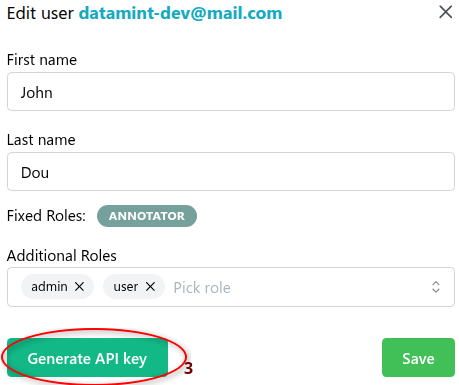
Click Generate API key to create a new API key.
Note
If you don’t have the necessary permissions, ask your administrator.
Configuring your API key
Once you have your API key, choose one of the following options:
Option 1: Using the CLI tool (recommended)
datamint config --api-key YOUR_API_KEY
Option 2: Setting an environment variable
export DATAMINT_API_KEY="your_api_key"
Option 3: Programmatically in Python
from datamint import Api

api = Api(api_key="your_api_key")
Step 4: Upload your images
Find the folder on your computer that holds your images (DICOM, NIfTI, video, or regular image files all work). Then run:
datamint upload /path/to/your/images
Replace /path/to/your/images with the real folder location. Typing a long path
by hand is error-prone, most terminal windows let you drag the folder from your
file browser and drop it into the terminal, and it fills in the path for you.
Dragging a folder into Ubuntu (WSL) pastes a Windows-style path
Dragging a folder from Windows File Explorer into the Ubuntu terminal often
pastes something like C:\Users\you\Scans. WSL needs it written as
/mnt/c/Users/you/Scans instead (lowercase drive letter, forward slashes).
Rewrite the path this way before pressing Enter.
The command will list what it found and ask for confirmation before uploading anything:
(...)
Do you want to proceed with the upload? (y/n):
Type y and press Enter. When it finishes, log into the
Datamint platform and you should see your files.
By default, uploaded files land in your inbox for review before they’re fully published. A few optional flags help keep things organized:
# Group files under a named channel
datamint upload /path/to/your/images --channel "Knee MRIs"

# Add one or more tags
datamint upload /path/to/your/images --tag "baseline"

# Skip the inbox and publish immediately
datamint upload /path/to/your/images --publish
You can combine all three in a single command.
Step 5: Upload segmentations along with your images
A segmentation is a mask file that highlights a region on an image (for example,
the outline of a bone or a tumor). If you have segmentation files that match your
images, upload both together with --segmentation_path:
datamint upload /path/to/your/images --segmentation_path /path/to/your/segmentations --publish
The two folders need to mirror each other. If an image is in a subfolder, its matching segmentation file should be in the same subfolder position under the segmentations folder.
After the upload, you’ll see a short summary confirming how many images got a matching segmentation:
(...)
Number of images with an associated segmentation: 4 (100%)
Number of segmentations with associated name: 4 (100%)
Tip
Need to name your segmentation labels, or link them to an AI model? Those are
covered in the full Command-line tools reference,
under --segmentation_names and --ai-model.
Troubleshooting
API authentication errors
Verify your API key is set correctly:
datamint config
SSL certificate errors
See the dedicated SSL Troubleshooting guide.
My upload finished, but I don’t see my files
By default, files land in your inbox, not the main published list. Check
the inbox on the Datamint platform, or re-run
your upload with --publish to skip the inbox next time.
What’s next
Once uploading feels comfortable, the full Command-line tools reference covers every option available, including advanced segmentation labeling and associating uploads with a deployed AI model.